A Crafting Christmas with Cricut

Since I bought my Cricut Maker back in November 2017 I haven’t bought a card but this Christmas I feel I have taken my skill set to a whole new level, so I am going to share some of my favourite makes which includes not only cards but a Christmas tree and an Advent Calendar.

E28B4224-AF4D-4496-9406-EF9838D78708.JPEG

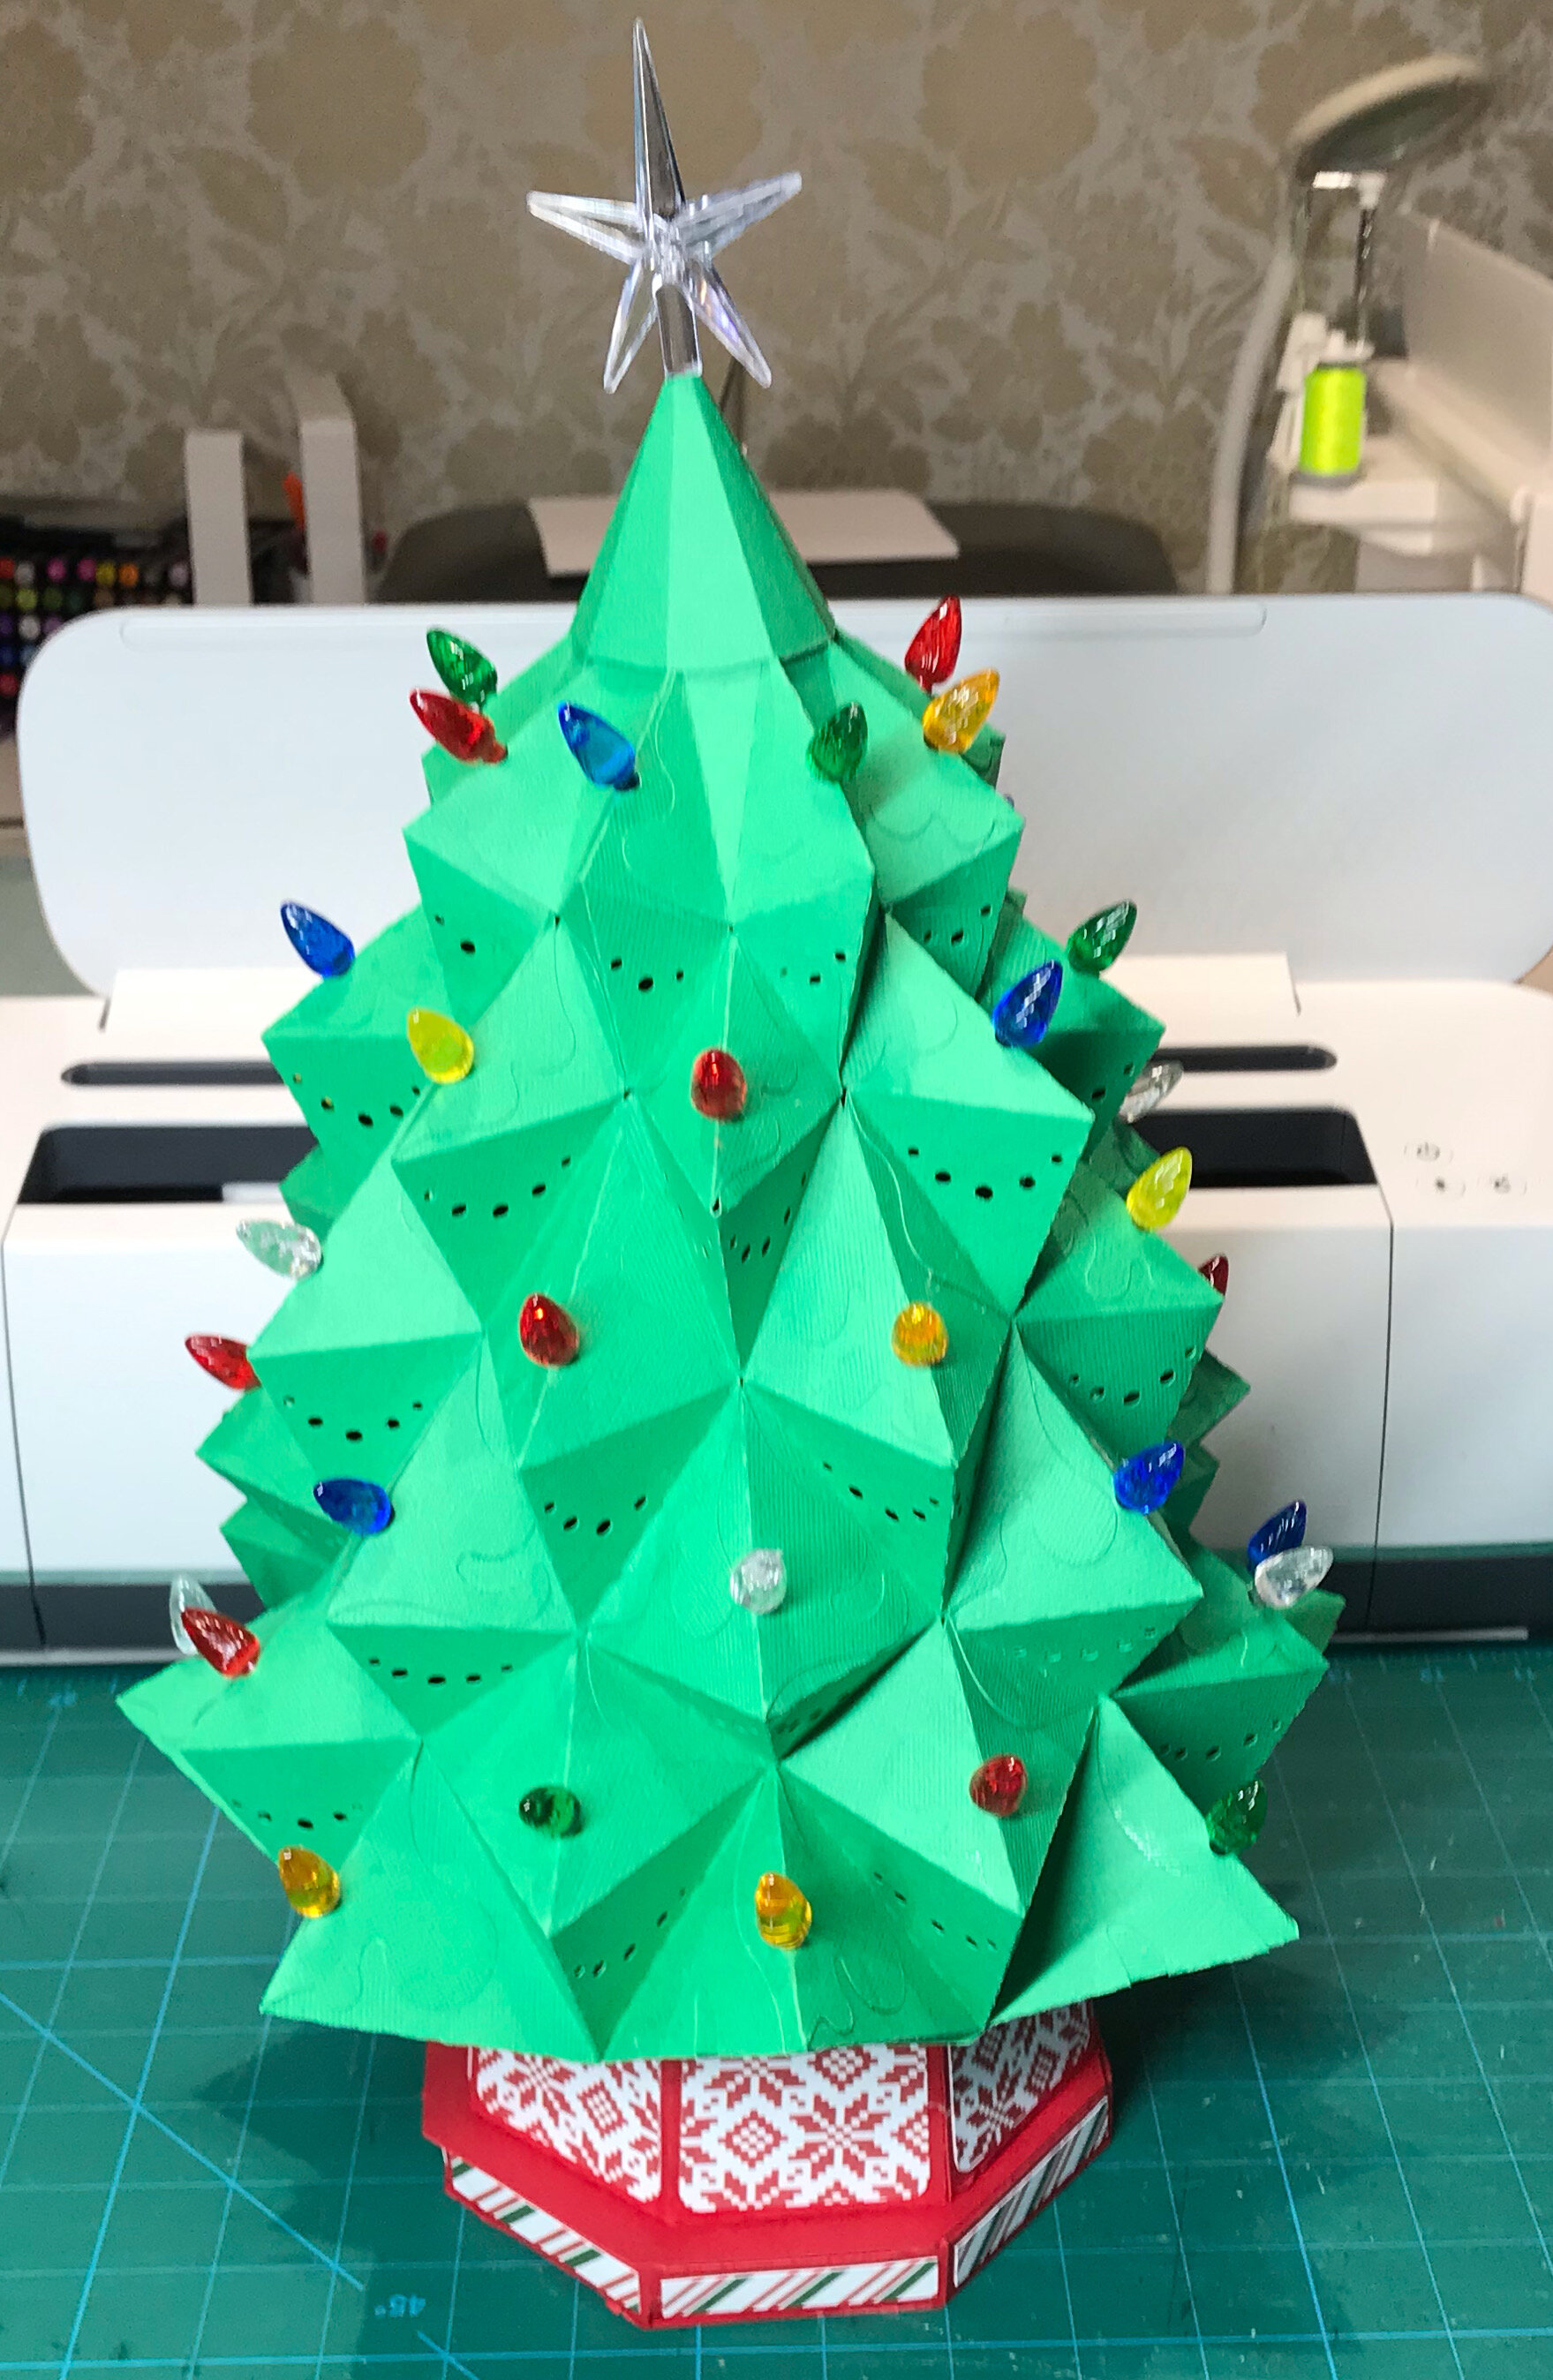
I think I have to start with the Heirloom Christmas tree from SVGCuts which is just amazing. I was looking for a small tree for an awkward space and it fit the bill perfectly. The tree looked a little complicated but as with most SVGCuts file there is a detailed video tutorial as well as a PDF file. The design uses 10 sheets of 12” x 12” cardstock for just the tree and as usual I struggled to find a pack of card in the colour I was looking for. I eventually found an American Crafts pack on Amazon coming in from the US which was at quite an inflated price but I had my heart set on this as American Craft paper is perfect as it has a solid core and is textured. Unfortunately it still took three weeks to get here.

The tree is lit up by a lamp that fits into the deep base. I was amazed to find the recommended lamp on Amazon but it came with a US plug so I had to return. The recommended ceramic tree lights were also available on Amazon. With no lamp I made up the tree and cut out the base until I figured out alternative lighting.

The tree is made of eight exact sides each made up of two pieces of card. All sixteen pieces need to be shaped before construction begins. The large and small pieces are first put together and each side is then attached to another to make four and these attached to another to make two which are then attached to each other to complete the tree. The last join is really tricky and I did enlist some help to hold the bottom as I moved up to the top. It didn’t actually take that long.

4070F50B-0B5B-4C05-B0F7-D43436812B89.JPEG

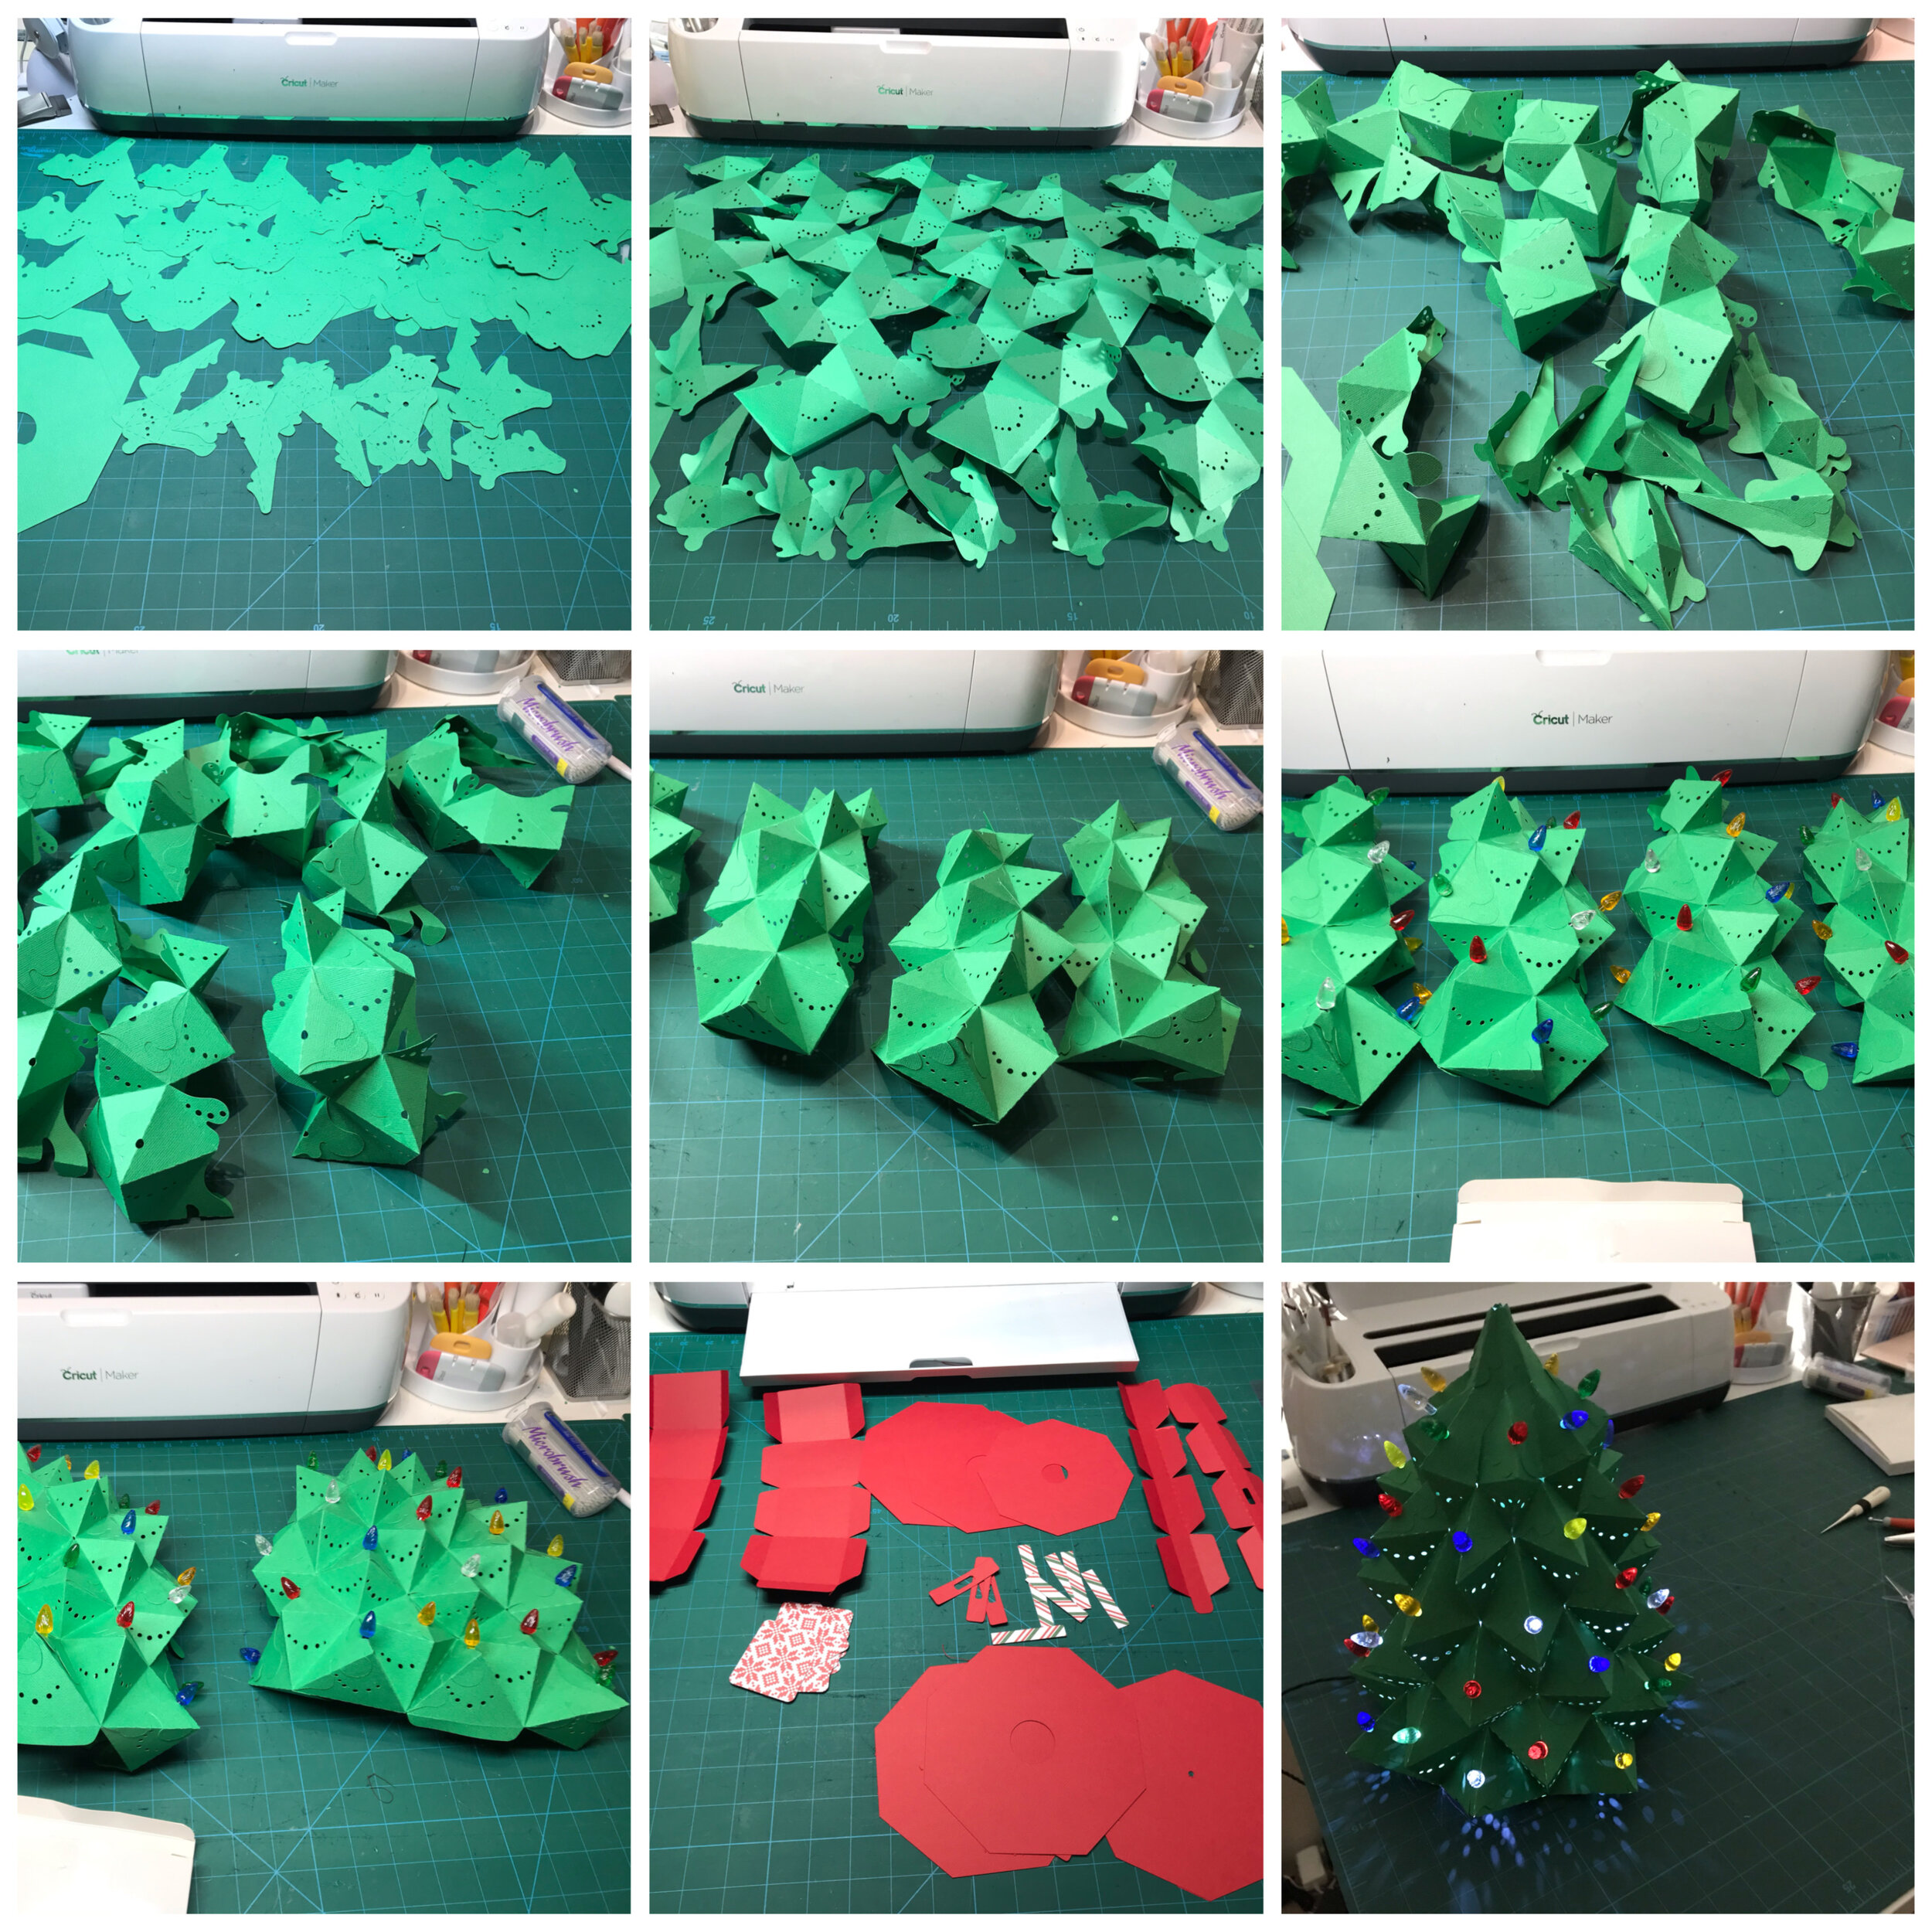
With all the manipulation the top of the tree looked a little out of shape and the plastic star that came with the tree lights was a little too heavy and needed to be supported. The fix was to design a little cone and wedge foam in the cone that I could push the star into.

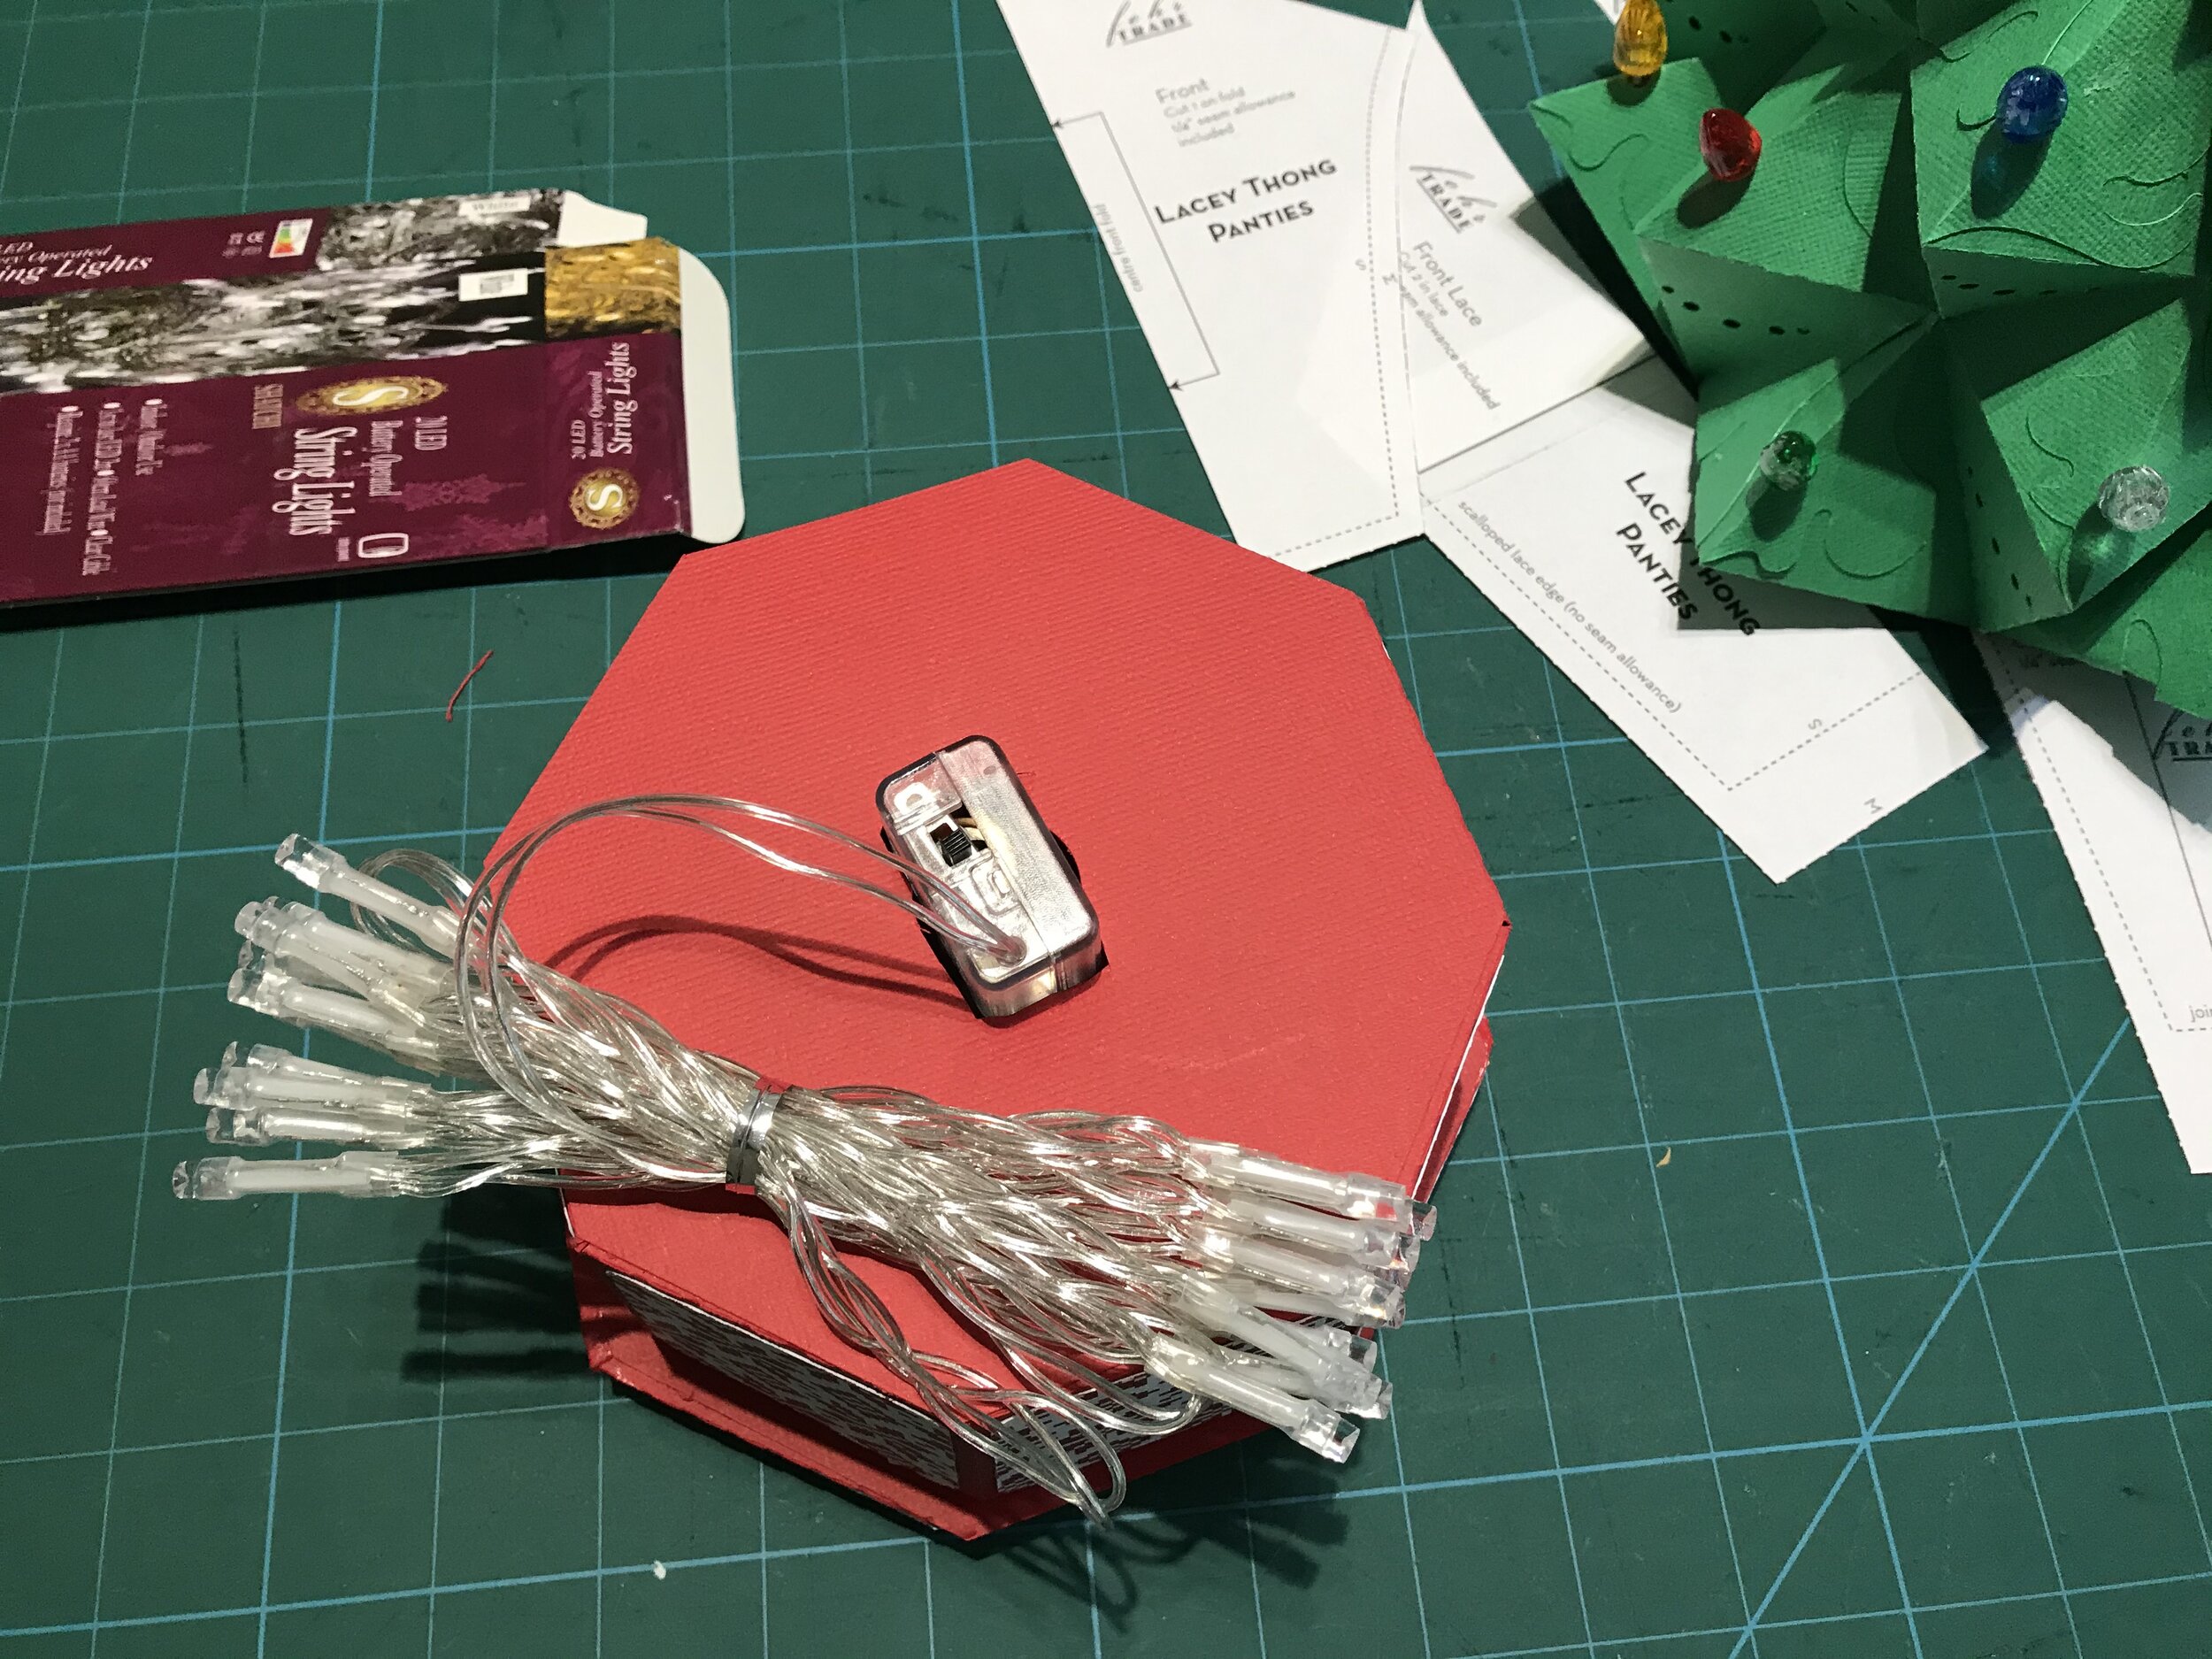
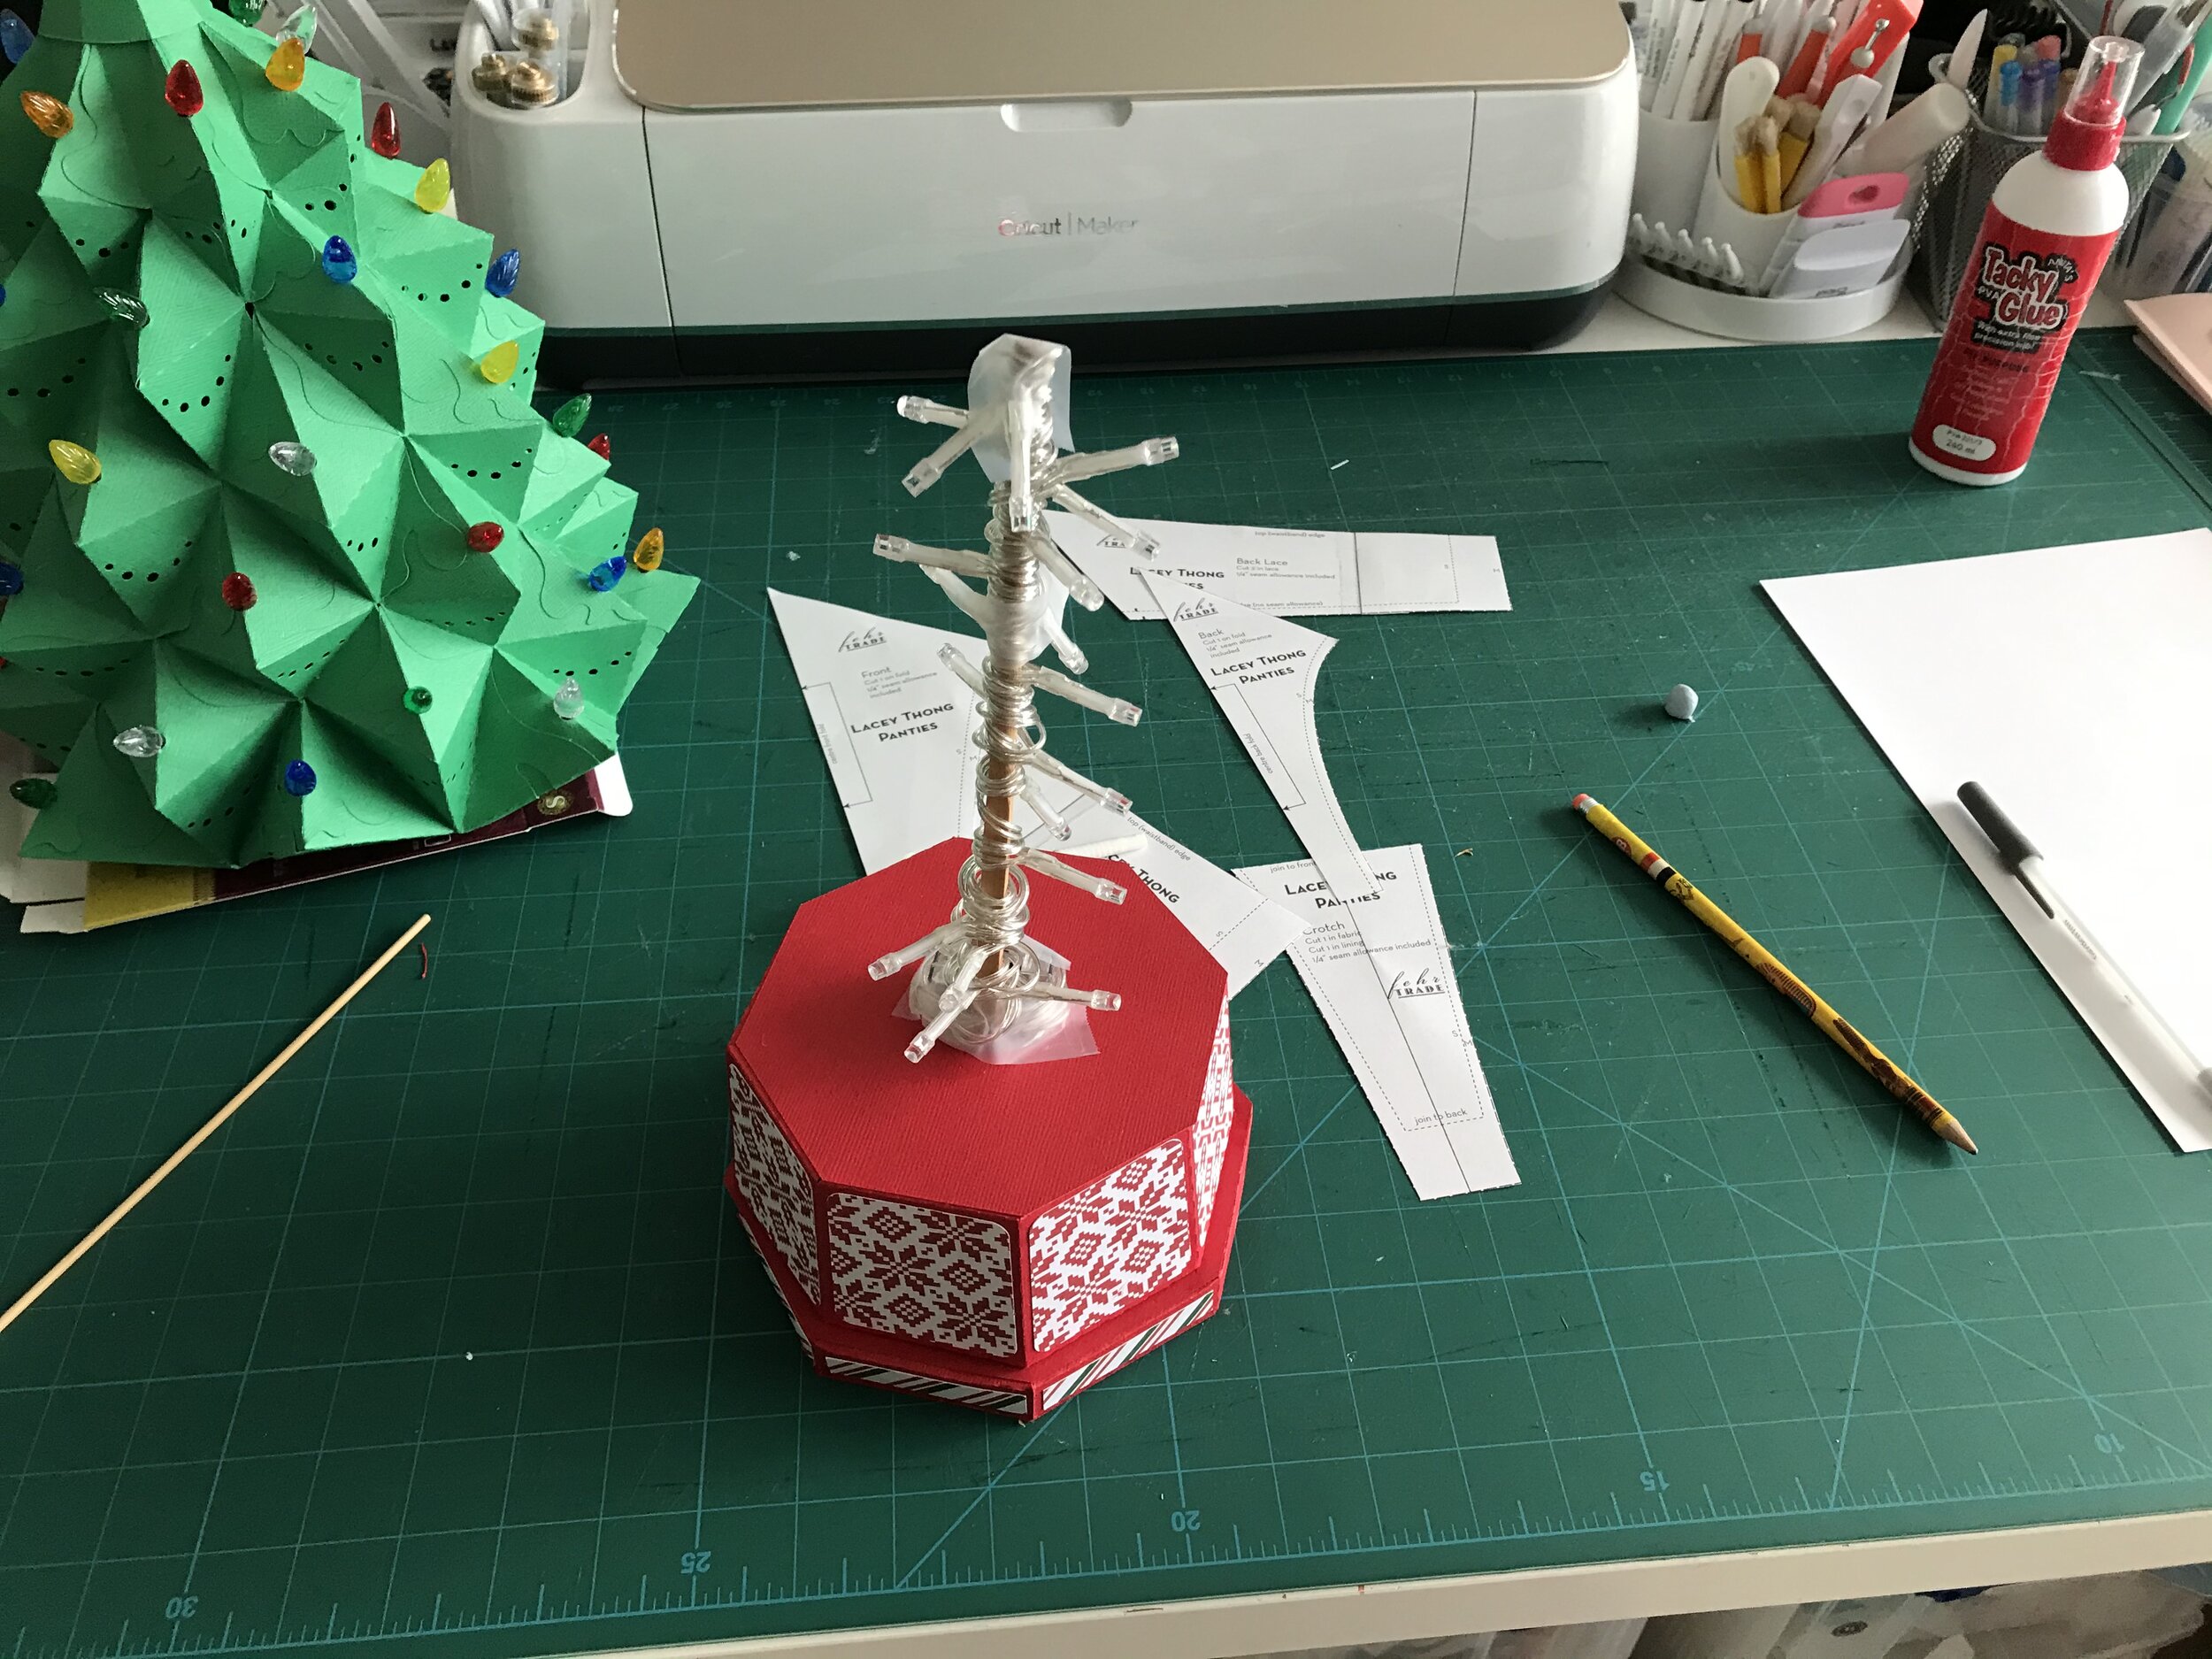
To see how the tree looked I sat it on a strand of lights and then I came up with the idea of using the lights on a pole. So I looked online for shorter strand as the one I had sat the tree on was just too much. I found a battery operated strand of 20 which I thought would be perfect. I had to cut a slightly bigger hole out of the base to accommodate the battery unit upright but I wanted to be able to access to change the battery. I wrapped the lights around a bamboo stick and taped this to the side of the battery unit. Yes!

145C6DA2-F71F-4B9D-9532-EE91CC40A64F.JPEG

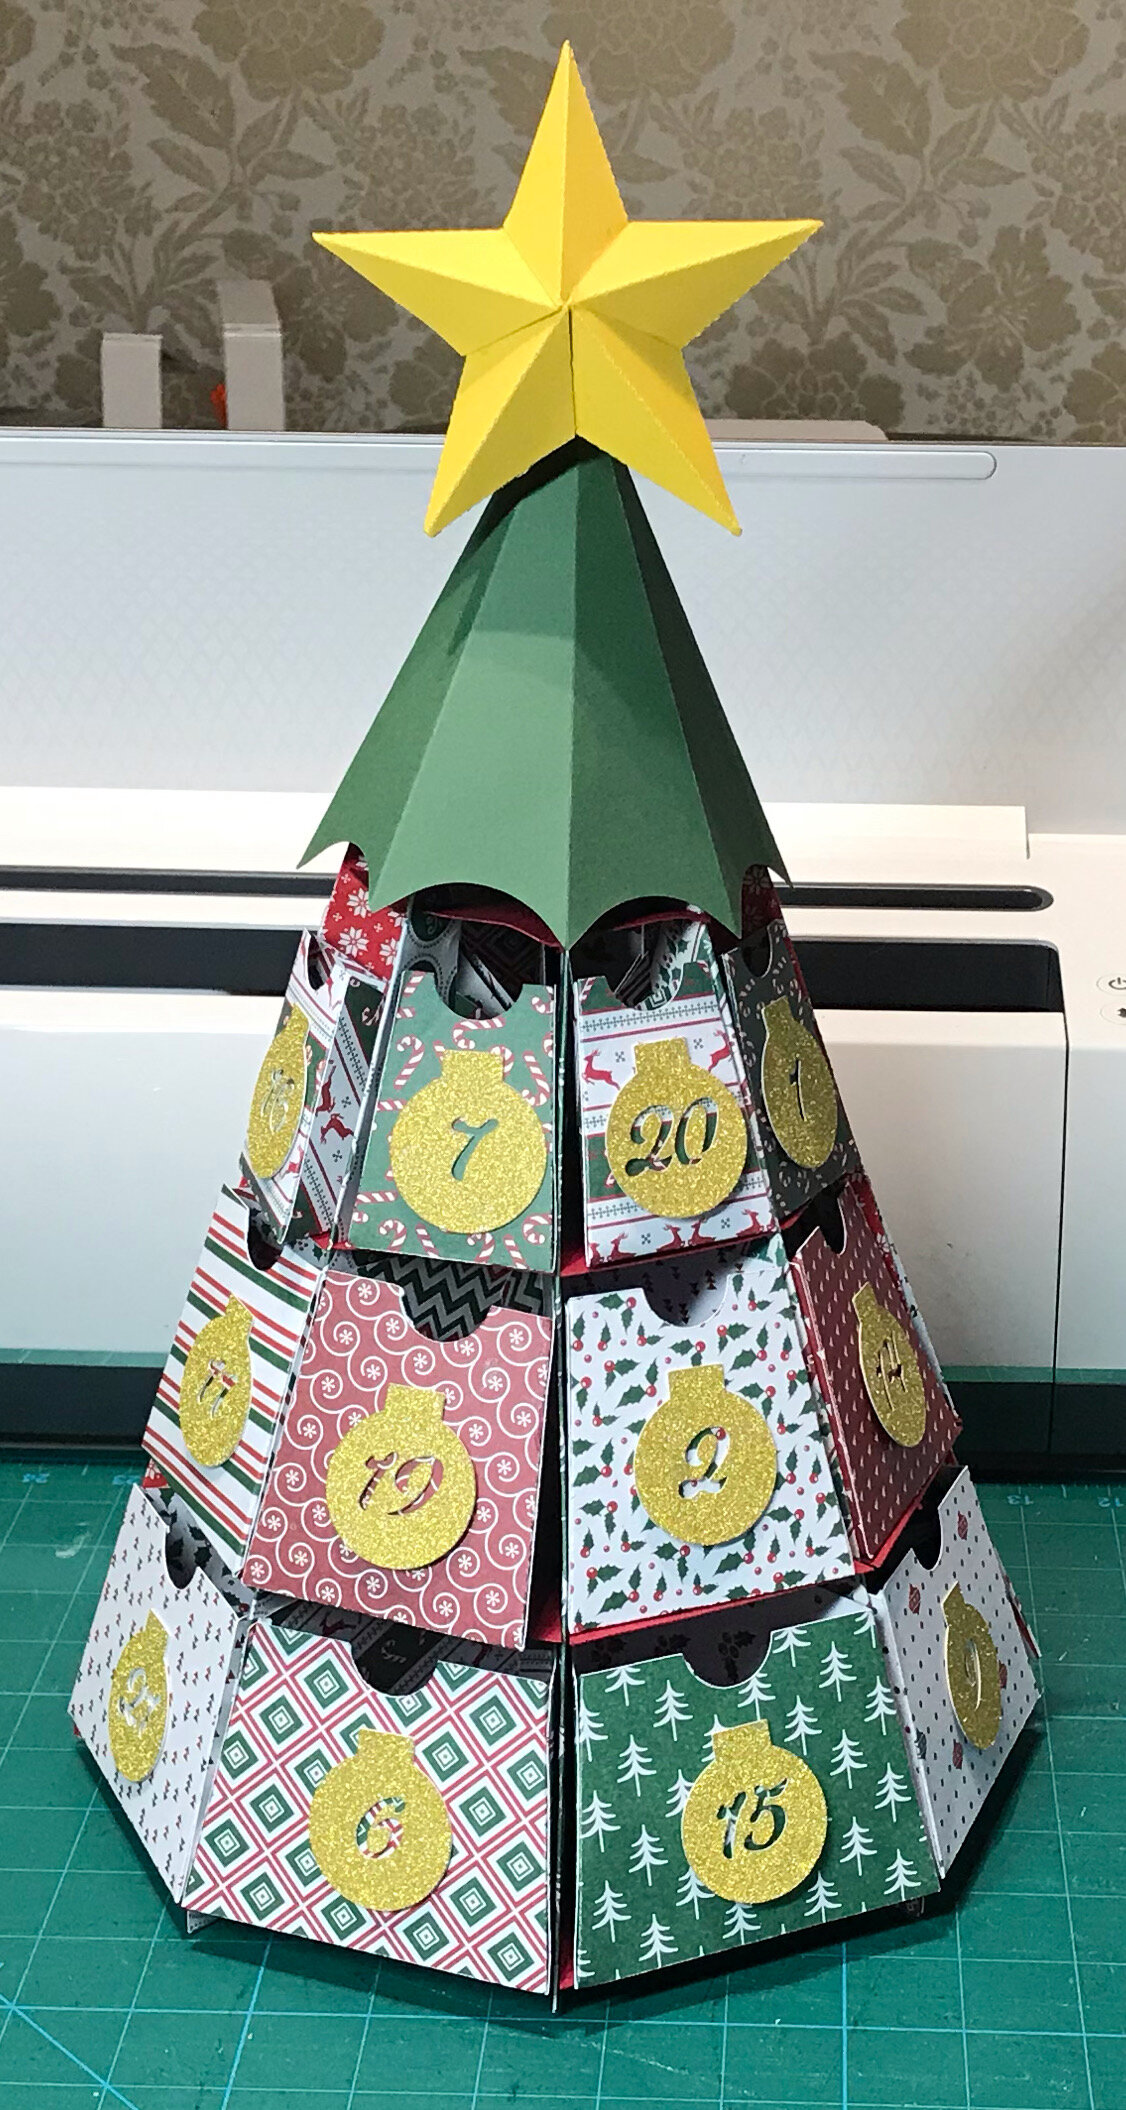
Next up is the a fabulous free Advent Calendar design from Jennifer Maker. I actually came across this design last year but didn’t get time to make it. Another cardstock hungry design but this time I made it using a £3 Christmas double sided pack from The Works. The card is a little thicker than the regular cardstock I use so I had to adjust the pressure but it does give greater stability to the structure and being double sided the inside of the boxes looked so much better.

The instructions are included in a blog which also includes a video. Once all the cutting is done this is a pretty quick make for exceptional results. The star is the Jennifer Maker Star Lantern which I scaled down and removed the light holes using the contour function. I attached the star using a cocktail stick and pushing this through foam in the cone.

Some of the numbers are difficult to see on some of the backgrounds so I may go back and put a solid colour on the back of the glitter shapes.

9FA18CBC-79A6-4D3B-ADCA-4CDB1B38A982.JPEG

Moving on to cards I would also like to share some of my favourite makes which are from SVGCuts Christmas Box Cards SVG kit and More Christmas Box Cards SVG kit. The Shadow Box Gift Card Box and Santa Money Card are from Lori Whitlock. I’ve made them all numerous times and they look so professional and some of my family have even kept them as ornaments.

2B24F704-77B4-4E44-9AC9-89129F61DF7A.JPEG

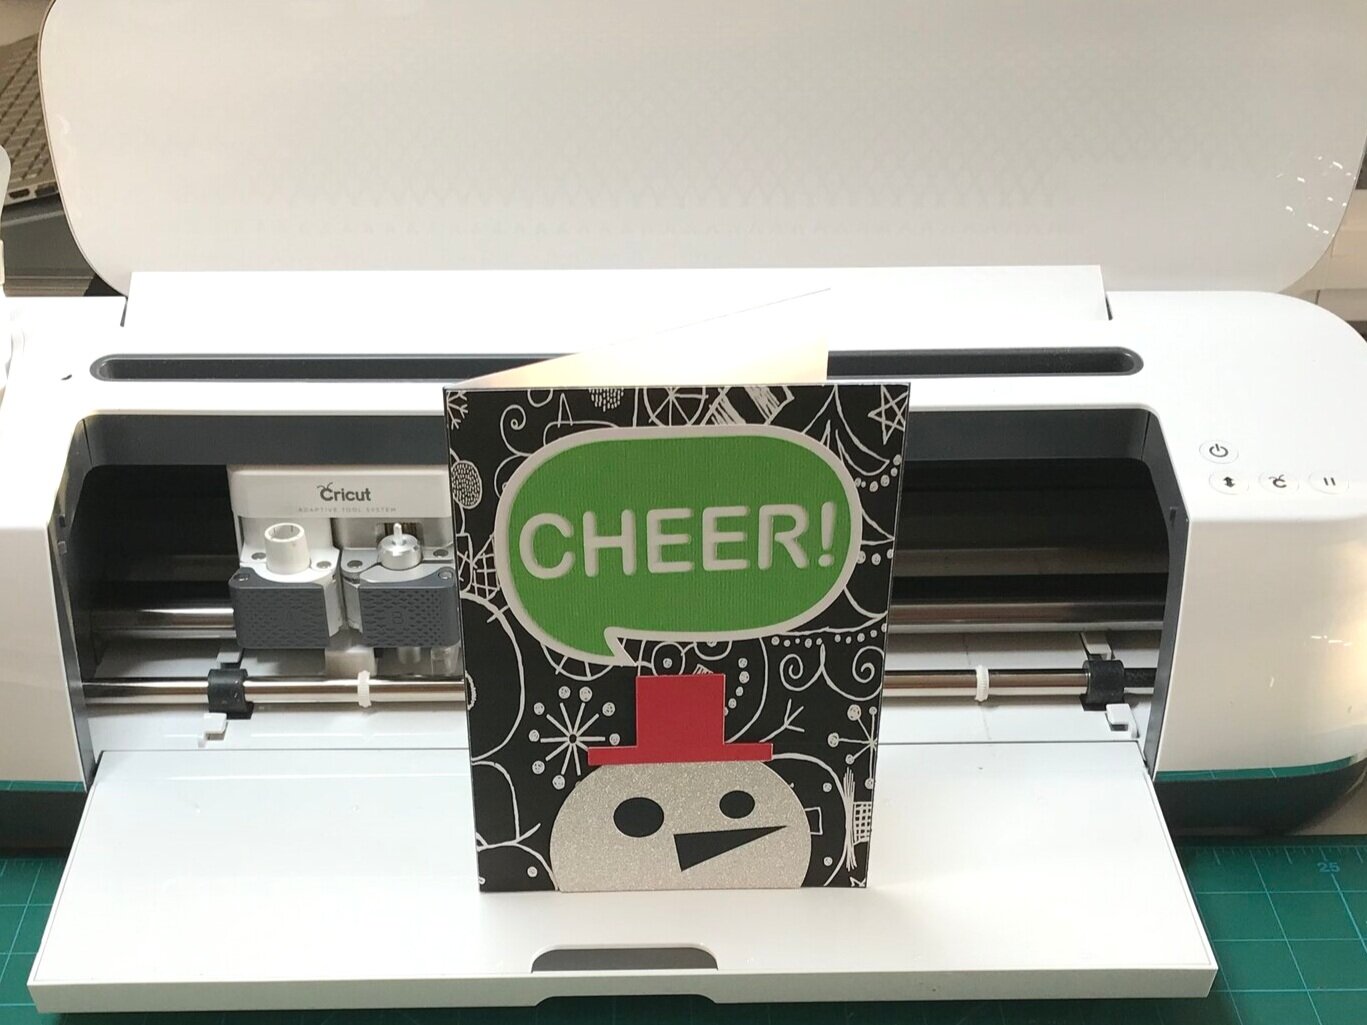
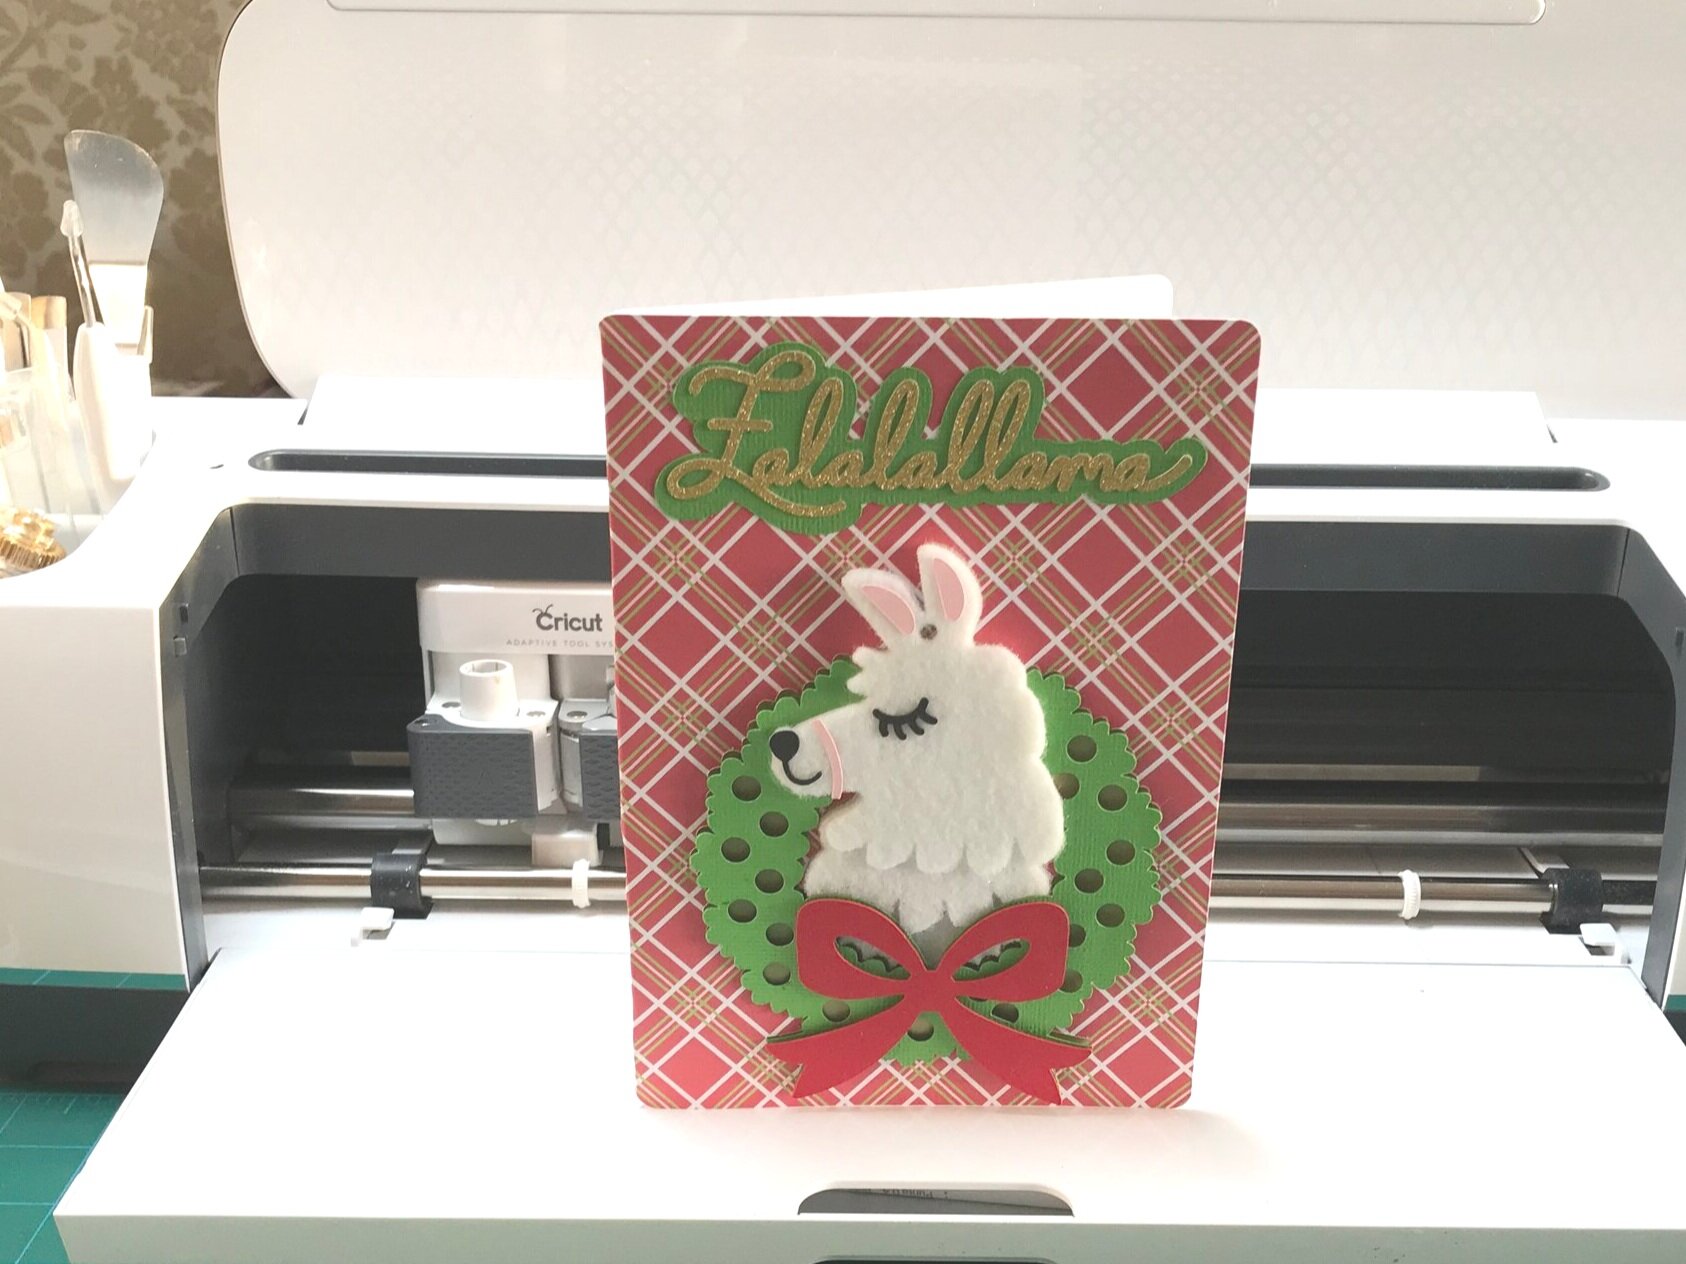
There are also some fabulous free designs as part of Cricut Access. My particular favourites are the Rob & Bob cards which are modern and fun. I didn’t take pictures of all of them but here are some of the very best.

IMG_2950.jpg

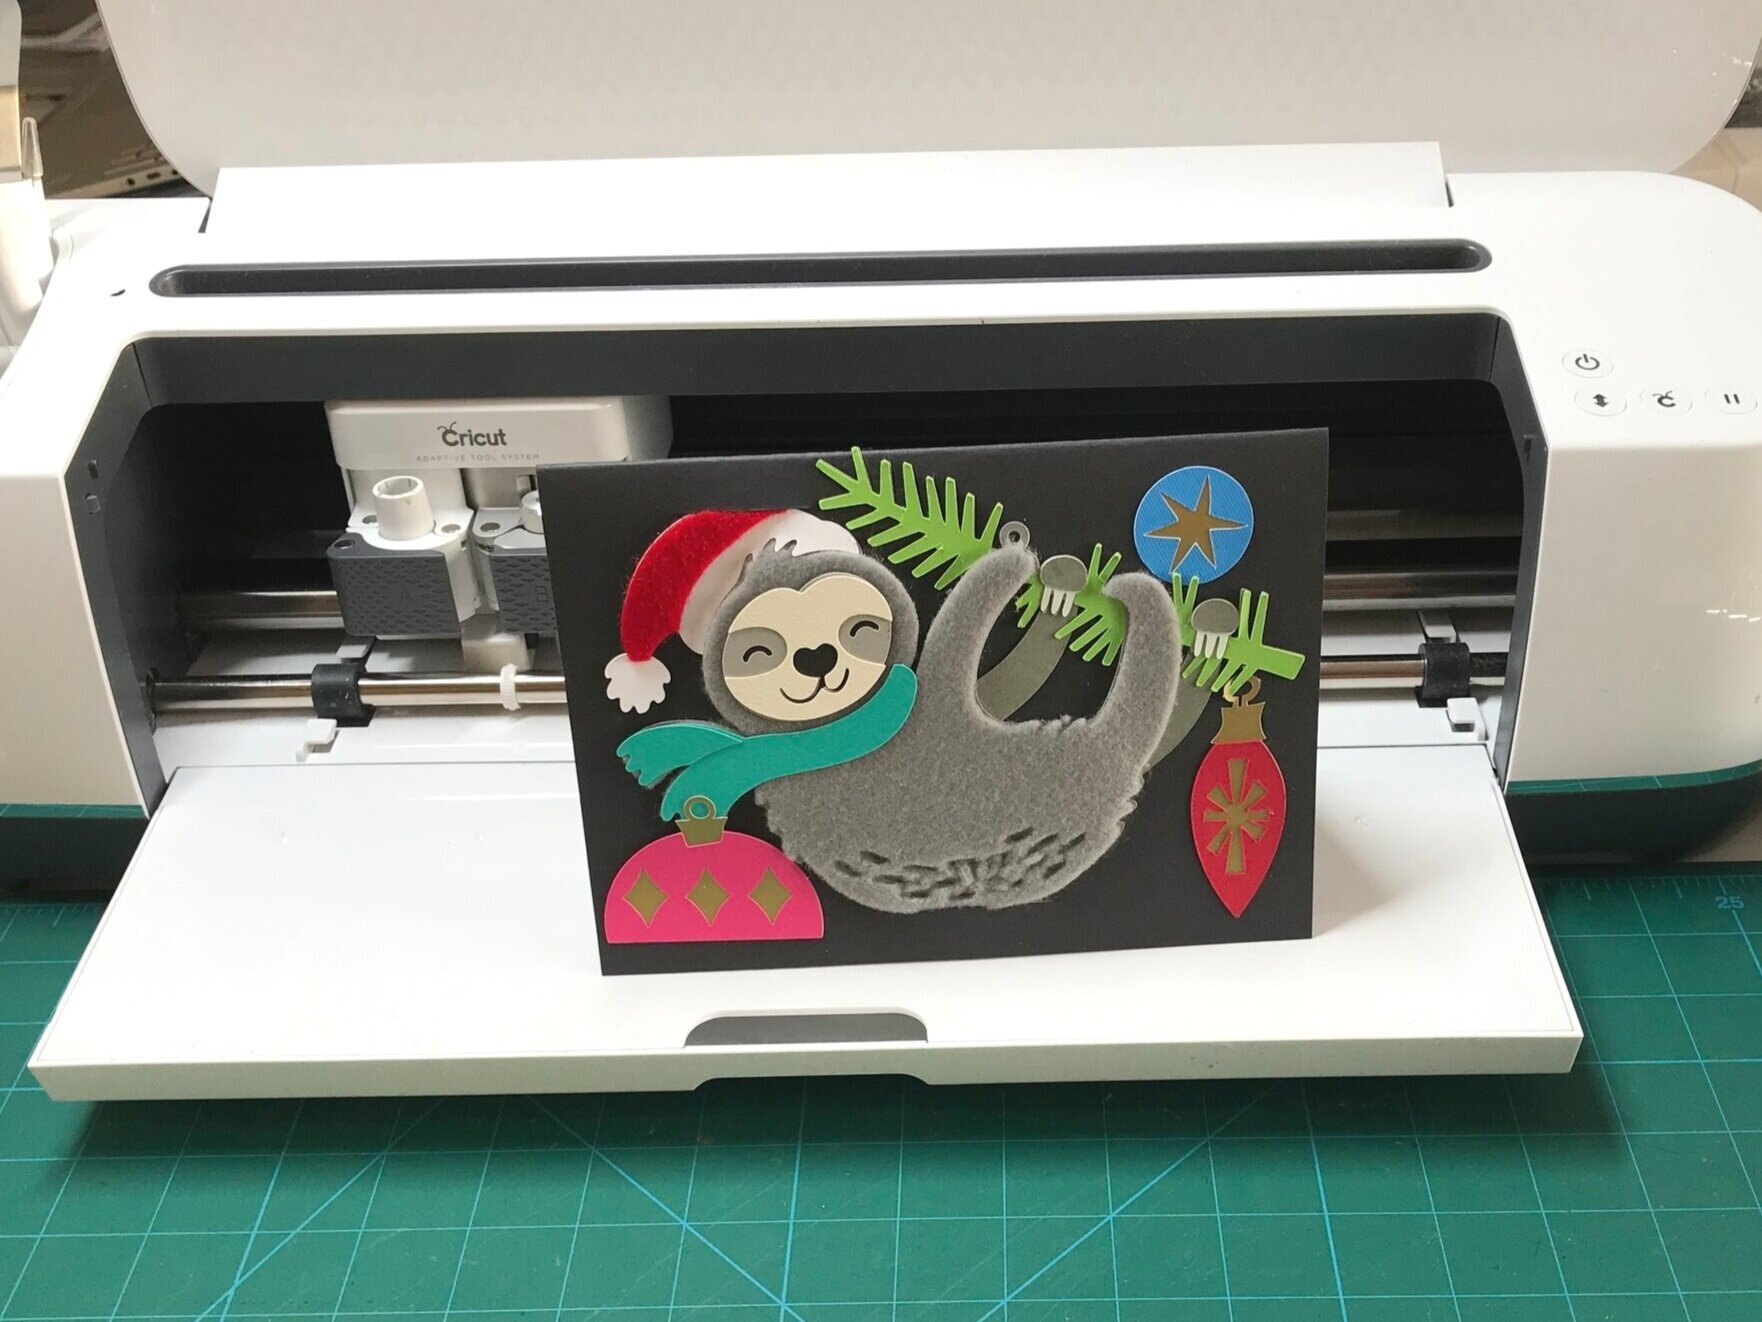
And finally you can’t go wrong with some bobble heads and googly eyes. This is a cute set from Lori Whitlock and I also have the animal set which is great for birthday cards.

So with Christmas over I’ve moved on to January birthdays!

The Ultimate Travel Bag - Another Major Project!

I just like to go off and do whatever takes my fancy. So when a Bluprint offer came along for Annie Unrein’s Ultimate Travel Bag kit I couldn’t resist the temptation, especially when I could get the online class as part of my subscription. The kit was fantastic, even including the plexiglass base stabiliser already cut to size.

2E726CE1-8CFF-442A-AF93-C48E98313312.jpg
IMG_2307.jpg

The big decision was how to quilt the fabric pieces. There are quite a lot of embroidery designs for squares but not many all over patterns. I found a free stipple design by Embroidery Garden which would fit my large hoop. I then used my PE Design to fit to the right size for the last hooping at the edge and bottom.

I have tried a variety of methods to quilt using my embroidery machine and struggled with both placement for multiple hoopings and the sheer bulk of the quilt sandwich.

Unless you have a long arm quilter the patterns suggests quilting in two pieces. The issue when using the embroidery machine is that with the fabric quantity supplied you need to get right to the edge of the fabric which makes hooping difficult. After a lot of research I thought I would try and use Madeira Super Film Iron Away Stabiliser. I hooped the film and then pinned the fabric sandwich in place. Each piece took eight hoopings of my largest frame (200 x 300). This was very time consuming but the big challenge came when I had to iron away the stabiliser. A hot and messy process and I am still finding bits of hardened plastic! However, well worth the time invested for someone who is not very good at free motion quilting.

IMG_2025.jpg

All the quilting done, then comes the task of cutting the many pieces. The pattern comes with a sheet of labels and it is really helpful as there are many similar pieces. I watched the class all the way through before going any further.

I worked my way through the pattern in order, strapping first, pockets, bottom and then zippers. My machine did struggle with the bulk when attaching the binding for the shoulder pad. A lot of layers to get through but it did come together pretty quickly once I got going.

Then on to the bag front and back. As all the preparation had been done the construction was relatively simple and the end was in sight.

There are two paper circle templates to shape the top and bottom of the front and back pieces. However, I cut these out in very thick card using my cricut so I got a perfect circle and I could use my rotary cutter.

I was extremely careful to double check all the measurements to ensure the zipper strip fit. I was so relieved when everything fit together perfectly. Wonderclips are your best friend for this job - as long as you remember they have a flat side! Let’s see how it holds up on a weekend trip. It certainly looks the part.

Everything in Its Place Bag

Just so I could use rainbow glitter vinyl!  Lucy, the tutor for the Fluorite Quilt, had all her tools in a great organiser that had glitter vinyl.  The vinyl had come from the Sewing Quarter and the pattern was by Annie Reineim but Lucy had made using a Craftsy Class.  A couple of days later an offer came along and I bought the Craftsy Class.  Had to wait a while for the vinyl to come in stock but worth the wait.

IMG_0847 (002).jpg
IMG_1270.jpg


Quite a long and expensive list of requirements to get together.  Got the fabric in the Patchfinders sale ( the annual 20% of everything).  Then there was the Soft and Stable, mesh, long zippers, zippers by the yard, vinyl.  Fortunately, Sew Hot stocks all the ByAnnie products.   Thought it best to use the same brand and then I could get a feel for the structure.  I do have a Bosal equilvalent also from Sew Hot. 

IMG_1292.jpg

The vinyl, from Sewing Quarter, came tightly packed flat which meant crease lines.  So leaving it in the sunshine was my idea to soften the folds!  It helped then I rolled it up for a while.  I was a little apprehensive about the quality but pleasantly surprised given the price.  

The idea was to quilt the fabric and then cut up.  Having just finished quilting in the hoop I thought I would try again.  I found another of Amelie Scott expansion pack with circles to match the fabric.  A bit of a disaster.  Just too much to get into the hoop.  I tried using Floriani Perfect Stick but not having it.  So thought I would test my freemotion quilting skills.  A bit too rusty.  Reverted back to straight lines with my walking foot!

I made the gusset first.  The zip went in well.  There was a bit of bulk to get through when sewing the top to the sides and I have a heavy duty sewing machine with a walking foot!

I moved onto the front and back pockets which uses the zipper chain.  With the zipper by the yard you have to put all the zipper pulls on first using an uncut end.  Really messy if you don't.  At this point I had to decide what combination of inside pockets I was going to make.  You mark the point of each zip, sew a line of stitching either side and then cut up.

Front and back pockets done I moved on to the vinyl pockets.  There is a handy template which I stuck onto cardboard.  Having carefully folded all nine up I basted in place using a Teflon foot (I bought it a while ago but never used).  Then you attach all the zips before attaching to the folders.

Once the pockets are in you apply the velcro.  I used my fabric glue stick to hold in place and switched to white thread.  Again hard going through two sets of velco and stabiliser.  All the parts ready it was time to put together.  You can use clips but I have some strong pins which I preferred to use.  Nothing moves with these.  You make one side and then the other.  There was quite a nifty way to make the binding.  

You then apply the binding along the same stitch line.  Most of corners worked out but I did go back and redo a couple of them as you are moving quite a bit of bulk around the corners.  There is also a good technique for joining the binding which I always have to think twice about before I cut.  It was quite a session to finish the binding but it was quite a relief when I had finished.  Then just the zipper pulls to do.  I felt exhausted but just got to the point where I had to finish.  

It looks absolutely fabulous.  I just hope I find some classes to go to so I can use.  Otherwise a very expensive make.  

1526922412760.JPEG

Fluorite Quilt and all things time saving

This was a class at Patchfinders all about an exploration of colour gradients.  Something I really struggle with!  The idea was to choose your own colours and design a crystal inspired quilt. Lucy, a designer on Sewing Quarter,  shows you tips and tricks to create a unique pattern that can be made to any size. 

IMG_1291.jpg

The idea was to use a combination of random half square and quarter square triangles along with square blocks to create the crystal look using solid and ombre colour fabrics.

I found this quite challenging and I ended up unpicking some of the combinations that I thought didn't work and moving around until I got something I was happy with.

Having moved on to sewing clothing I had to reacquaint myself with patchwork techniques.  I had forgotten how satisfying it was to cut up fabric into small pieces and put back together in a pattern.

IMG_0671 (002).jpg

So what to back it with.  This was also quite a hard choice because of the combination of light and dark fabric.  So the backing would have to be light enough not to show through on the right side and dark enough that the dark fabric on the right side would not show through.  Back to Patchfinders and went with a sort of mottled purple.  Rather than buy two lengths I used the fabric left over to create a centre strip graduating in colour.

IMG_1268.jpg

So now I would need to quilt!  How to save time and effort?  The first point I dread is the pinning the layers together.  So I bought a micro stitch gun.  Then I got out the Janome quilt binder set I bought just as I stopped making quilts.  Needed a bit of practice.  Free motion quilting not my thing and the thought of flinging the quilt around my machine got me thinking about using my embroidery machine.  After scouring the internet for something suitable I finally found some continuous designs from Amelie Scott for use in the hoop.


The angle design was part of an expansion pack of ten designs.  Each comes in three sizes with an A and B file.  The practice on a small scale went well.  

Using on a real quilt was more challenging.  With my largest hoop it took 28 hoopings.  The most difficult part for me was getting the hoop in the right place.  I used double sided basting tape to keep in place but had to keep changing.  Then the design was so large in the hoop there wasn't much room for moving the start point if it wasn't quite right.  I really appreciated the LED pointer I had purchased.   I also need practice in drawing up threads at the start and end.  As the thread matched the backing fabric it looks fine except in the middle where I had patched in the leftover fabric.  

IMG_1289.jpg

Quilting done it was time to bind.  So then I had to practice using the binding set. A few You Tube videos later I had got the hang of it although the mitred corners weren't perfect.  So impressed with the binding set.  Just breezed through the quilt.

A good day for gadgets.  Just not enough hours in the day to make all I want especially as I keep getting sidetracked!